Raspberry Pi Device Provisioning
Raspberry Pi installation
Prerequisites:
- Raspberry Pi 3B, 3B+, 4B
- MicroSD card (recommended SD card size is 32GB and above, as fast as possible)
- Etcher software for flashing (link below)
Download a signageOS system image
The latest system image can be found here:
| Raspberry Pi Version | Link to Image |
|---|---|
| 3B, 3B+ | DOWNLOAD THE IMAGE AT https://o.signageos.io/rpi |
| 4B | DOWNLOAD THE IMAGE AT https://o.signageos.io/rpi4 |
Writing an image to the SD card
You will need to use an image writing tool to install the image you have downloaded on your SD card.
Etcher is a graphical SD card writing tool that works on Mac OS, Linux, and Windows, and is the easiest option for most users. Etcher also supports writing images directly from the zip file, without any unzipping required. To write your image with Etcher:
- Download Etcher and install it.
- Connect an SD card reader with the SD card inside.
- Open Etcher and select from your hard drive the Raspberry Pi .img or .zip file you wish to write to the SD card.
- Select the SD card you wish to write your image to.
- Review your selections and click ‘Flash!’ to begin writing data to the SD card.
Initial Boot
Once it's flashed, plug the SD card into the Raspberry Pi, connect the HDMI, ethernet, and power cords. It's important to connect the Raspberry Pi in proper order, so all components used are safe.
If you are not sure how to connect the RPi to the device, you can refer to the manual: Raspberry PI installation.
The initial boot is creating system partitions and preparing the environment. It can take a couple of minutes, and the device will reboot multiple times in the process!
After the initial boot, you will see a standard signageOS initial page with the Verification hash. From this point on, you can either assign an Applet to this device from Box or via REST API or continue with installing a pre-built Open application.
To get the latest updates, patches, and features it's strongly recommended upgrading to the latest Firmware from Box (or via JS/REST API), once you provision your RPi:
[OPTIONAL] Installing the Open application
Prerequisite
- you have developed, build, and generated your Open app
- you have uploaded the generated zip file to your server accessible from the network which the RPi is connected to
Steps
- Connect the keyboard to the RPi
- Access the RPi OSD Menu by entering device PIN + ENTER
(when you are entering the code, you won't see anything on the display)
Tip: the PIN is available under the Device detail in Box
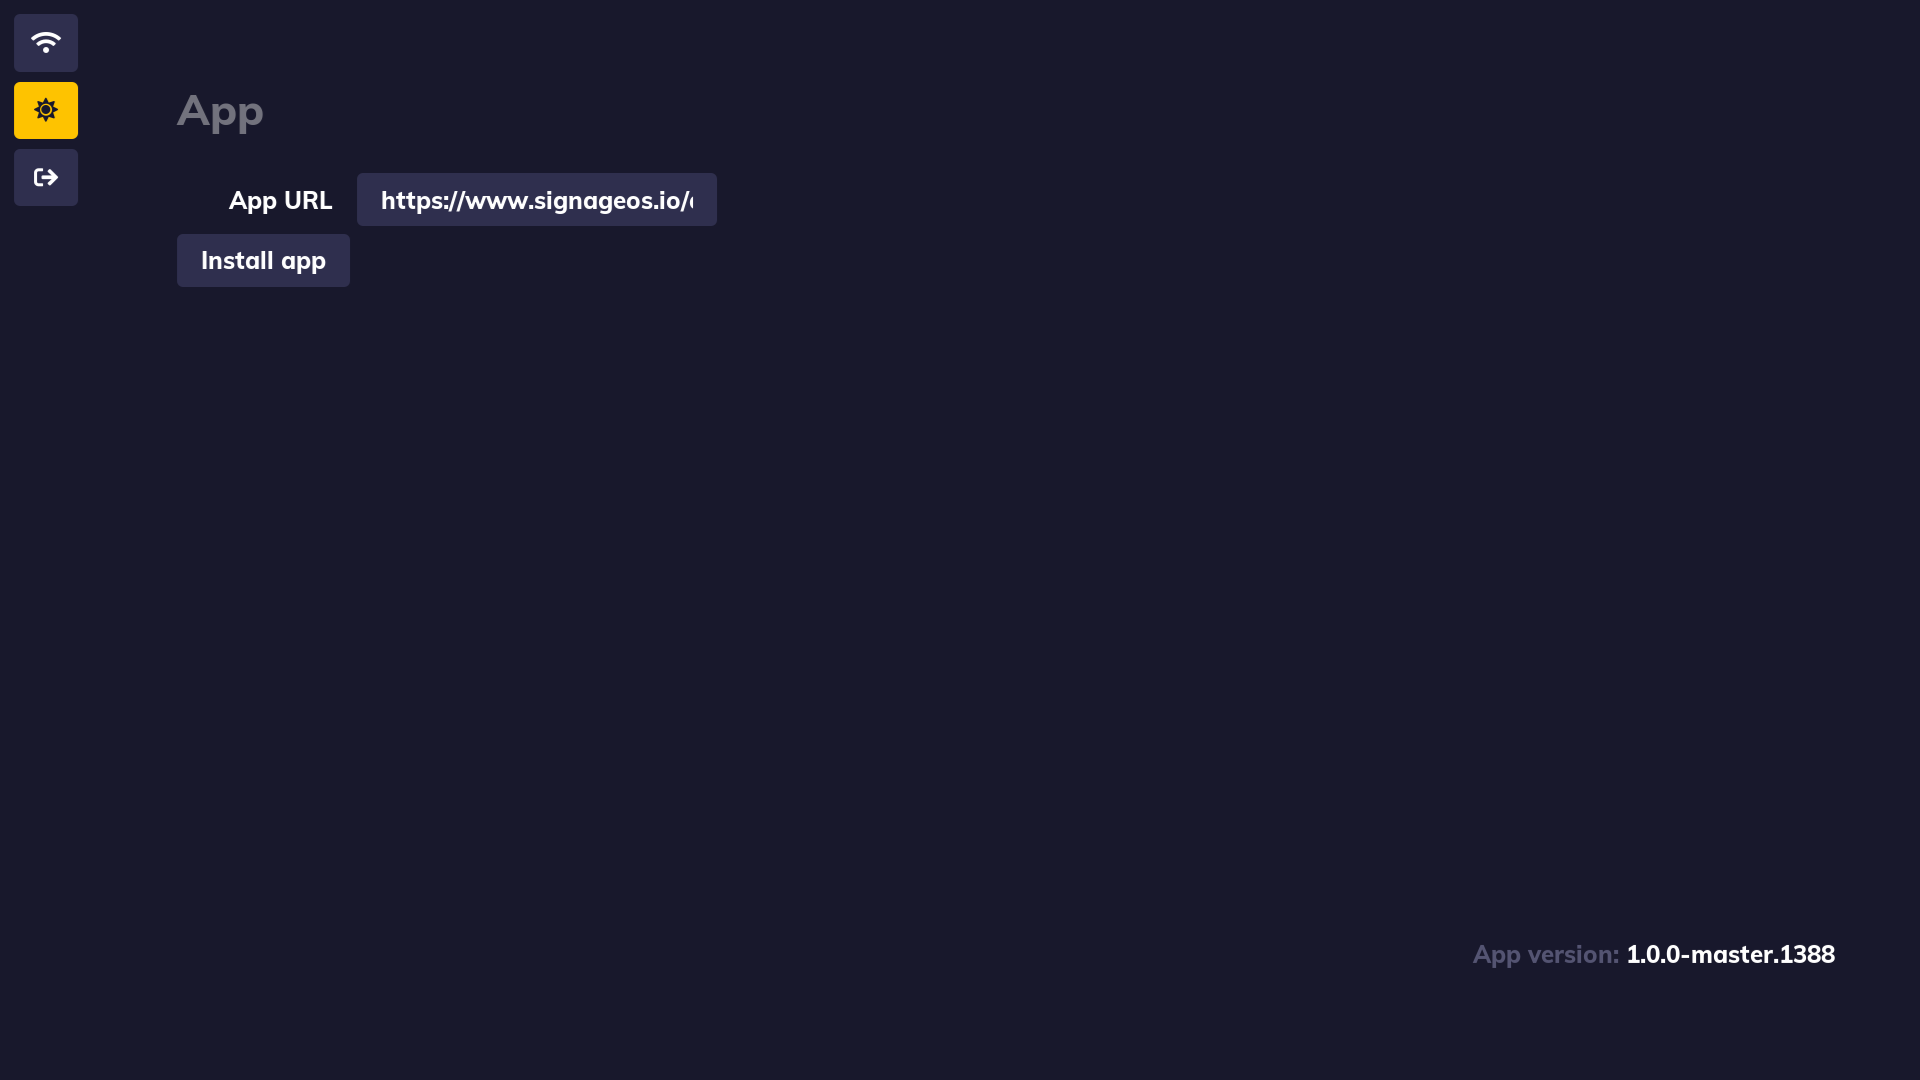
- In the OSD, fill in your Open Application URL e.g.: https://link-to-your-image.your-cms.com/app.zip, and click Install App
Tip: Move in OSD with
ARROWS, to access the input field pressENTER, to exit the input field pressESC
The system will download the application, verify its integrity and install it.
RPi 4 Limitations
- RPi 4 is capable of playing only FullHD video (landscape/portrait); the UHD support is in progress
- RPi 4 supports only single HDMI output
- If your RPi 4 is hw revision 1.4 or higher, an image 2.0.0 is required for full functionality
Next steps
Learn how to add a new device via Box
Learn how to add a new device via REST API!
FAQ
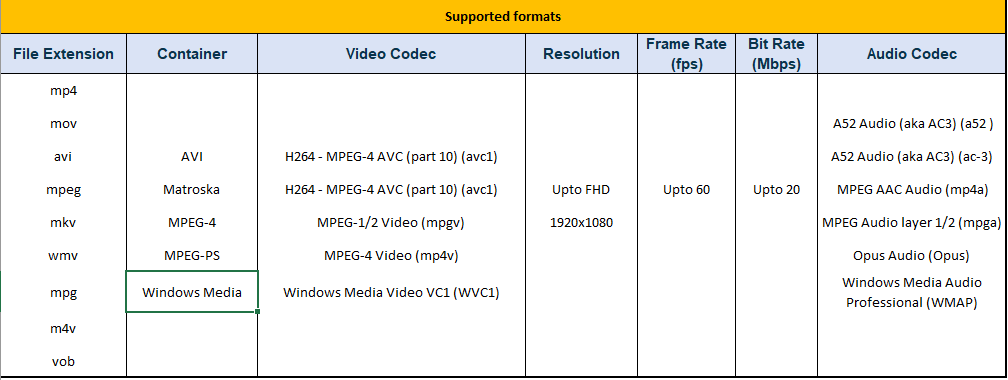
Media formats The list of supported media is here: Supported Video Formats
Video Aspect Ratio Currently, only the same aspect-ratio video files should be played otherwise it will conflict with graphics output.
Switching between device applications If there is a build-in application installed in the device, you need to switch to the Raspberry Pi software. Most probably you can just use the exit button on the remote controller, as it's in the LG devices.
Debugging To debug your RPi you can use Native debug.